Stir fried spicy noodles with pork and mushrooms

Pasta is a great and easy option for weeknight dinners but that doesn’t mean it is always the best option. It’s easy to make a bit too much and it’s also very tempting to put creamy sauces or heaps of cheese on. So if you’re looking for a weeknight meal that’s easy, cheap and healthy it’s great to have some hokkien noodles in the cupboard. They’re super easy when you want a quick dinner- you don’t even have to cook them and they’re pre-packaged so you can keep track of portions and nutrition info. This is one of my favourite stir fry dishes to make with the noodles. It’s pretty versatile and you can use pork or turkey mince- whatever you have on hand. When you’re cooking the meat with the mushrooms and sauce it will seem like there is a bit too much liquid but once you simmer for a couple minutes and add the hokkien noodles they will soak up the sauce. Hokkien noodles are available at most grocery stores and at Costco you can often get a big box for just a couple dollars.

IMG_6203

Adapted from this recipe
Serves 4

2 tablespoons dark sesame oil, divided
4 servings of hokkien noodles
1 bunch green onions, trimmed and cut into 1-inch pieces
12 ounces lean ground pork
8 oz. sliced mushrooms
1/2 cup chopped onion
1/4 teaspoon kosher salt
3 large garlic cloves, minced
2 teaspoons cornstarch
2 cups chicken stock
3 tablespoons lower-sodium soy sauce
1 tablespoon sriracha
4 lime wedges

Heat a wok or large skillet over medium-high heat. Add 1 tablespoon oil to pan; swirl to coat.

Add pork to pan; sauté for 2 minutes, stirring to crumble. Add mushrooms and saute 2 more min or until brown. Add the green onions.

Stir in chopped onion, and salt; sauté 3 minutes, stirring occasionally. Add garlic; sauté 30 seconds, stirring constantly. Stir in cornstarch. Gradually add stock; bring to a boil. Stir in soy sauce and sriracha; cook for 1 minute, stirring frequently. Add the hokkien noodles and stir to combine. (Some hokkien noodles will need to be softened in boiling water- check the instructions on the package). Divide the noodles and and pork mixture among four shallow bowls. Serve with lime wedges.

photo (10)

3 Comments

Filed under Dinner, Recipe

Pea and haloumi fritters with tomato salsa

IMG_5510

This is a great meal for lunch or dinner. I made it for lunch one day when I was running low on cash to go grocery shopping and decided to just make something with whatever I could find in the fridge. Luckily I had some frozen peas, a bit of haloumi, some red onion, plus eggs and flour. I’ve done variations of these fritters since- one with zucchini, corn and haloumi which has actually turned Ciaran on to eating haloumi. I never thought I’d see that day. All you really need for these fritters is some eggs and flour to make the base and then your choice of veggies. The haloumi is also essential because other cheeses will melt too much and you’ll have a puddly mess of dairy and veg. If you’re using veggies that you have to chop yourself, basically anything other than peas and corn, make sure you cut the pieces very very small or your fritters will be very ugly and fiddily.

Recipe from Vegie Project

  • Prep time: 10 min
  • Cooking time: 10 min
  • Servings: makes 12
  • Difficulty: easy

Ingredients:
1 cup frozen peas
1/4 red onion finely diced
30g haloumi cheese finely diced
2 eggs
1/2 cup self-raising flour
salt and pepper to taste
olive oil to shallow fry

Tomato salsa:
2 tomatoes finely chopped
2 tablespoons chopped coriander
1/4 red onion finely diced
juice of half a lime
salt and pepper to taste
a pinch of chilli flakes

IMG_5509

To prepare the tomato salsa just combine all the ingredients in a bowl and season with salt and pepper to taste. Set aside.

Place the frozen peas in a small saucepan with water and boil them for 2 minutes. Drain and set aside.

To make the fritters simply combine all ingredients in a bowl.

Heat 2 tablespoons of olive oil in a non-stick frying pan. Drop tablespoons of the fritter mixture into the pan (about 2 tablespoons will make one fritter). Flatten the fritters slightly with a spatula. Cook the bottom side for about 3 minutes until a crust forms, then using a spatula flip the fritters over and cook for another 3 minutes.

Serve with the tomato salsa.

-A

Leave a comment

Filed under Dinner, Lunch, Recipe

Coconut crusted chicken tenders

IMG_5618

Just wanted to let you all know that we’re still here. Surprisingly, even though we’re no longer students we still find ourselves quite busy. But just in case you needed some weeknight meal inspiration this week, here are some delectable coconut crusted chicken tenders. Perfect for a simple dinner with a side salad and easy to take on the go for lunch the next day.

Enjoy!

-A

Coconut Chicken Tenders

Recipe from Can you stay for dinner?

(serves 4)

  • 1 lb chicken tenderloins or chicken breasts, sliced into long, 1″ thick strips
  • 1/2 cup all purpose flour
  • 2 eggs
  • 3/4 cup panko bread crumbs
  • 3/4 cup shredded, sweetened coconut
  • 1 teaspoon salt
  • 1/2 teaspoon black pepper
  • 2 tablespoons canola oil

Preheat oven to 400°F/200°C. Create an assembly line for easy coating of each tenderloin: Place all chicken strips on one plate. Next to that, place flour in a wide, shallow bowl. Lightly whisk eggs in another wide, shallow bowl. Combine panko, coconut, salt, and pepper in a fourth and final wide, shallow bowl. Now, take one chicken strip and toss it in the flour, shaking off the excess. Then, dredge the floured strip in the egg bath. Next, gently toss the chicken strip in the panko/coconut mixture, pressing to coat on each side. Place the coated strip on a plate or cookie sheet until you have finished coating all of the chicken.

Next, heat a large skillet over medium-high heat on your stove top. Add one tablespoon oil, swirling to coat. Add half of the chicken strips in a single layer, leaving space between each one. Cook for about 3 minutes, then flip and cook for an additional 3 minutes. Remove the chicken to a foil lined baking sheet coated with nonstick cooking spray. Add the remaining one tablespoon oil to the pan and then the second half of the chicken strips and cook for 3 minutes per side. Remove that second batch and place on the baking sheet. Set it in the oven for 10 minutes, so that the chicken tenders can cook through.

IMG_5611


IMG_5614

IMG_5613

IMG_5615


Leave a comment

Filed under Dinner, Lunch

Chicken tenderloins with baby beetroot and ricotta

IMG_5609

Beetroot was always a touchy subject in my house. My brothers and I have been shipped back and forth from Australia since we were each just a few months old so we’re no stranger to things like Vegemite, sausage rolls, pavlova…your typical Aussie classics. We pretty much all eat Vegemite, a feat we should all be proud of. And there was never any debate when sausage rolls or pavlova were in the house. But beets were different. I believe we were introduced to them in the best way possible, not mushed up as a side dish, but placed gently on a beautiful stacked burger. We used to have ‘make your own’ burger nights and it would be a little buffet of things to top your meat patty with. Everything from cheese to ketchup, lettuce, mustard, tomatoes, chutney, etc. And in the assembly line there was always one bright pink bowl of beetroot, poured ever so gently from a tin can and pre-sliced for general ease. Dad would always load up his burger with just about everything but he avoided those beets like the plague. I don’t remember my brothers being too wild about them either but I don’t think they ran away quite so quickly. I, on the other hand, was happy to slap them on watching my bun and my fingers turn a nice fluro rose colour. Now that I live in Australia I figured it was time to experiment with beetroot in other dishes. And that’s exactly how I came upon this easy little salad recipe. It’s quick, low-fat and simple. The anchovies are optional in my opinion, I personally love anchovies so I was happy to put them in at first but I felt like they added a strange flavour amongst the acidity of the beets and the richness of the ricotta. Also when I had the salad the day after I totally forgot they were in there and was pretty thrown off by one bite that was particularly fishy. I also left out the red wine vinegar because I didn’t want to buy a whole bottle for just one tablespoon and used really nice olive oil instead.

Chicken tenderloins with baby beetroot and ricotta
Recipe from Taste.com.au
Serves 4
Ingredients:

  • 12 chicken tenderloins (about 90g each)
  • 2 tsp olive oil, plus 1 tbs extra
  • 2 tbs shredded basil leaves
  • 8 canned baby beetroots, drained, halved
  • 1/2 small red onion, thinly sliced
  • 80g baby rocket leaves
  • 2 anchovy fillets, roughly chopped
  • 1 tbs red wine vinegar
  • 3 tbs (60g) fresh low-fat ricotta
  1. Combine the chicken, olive oil and basil in a bowl and season with salt and pepper. Heat a large non-stick frypan over high heat and cook the chicken for 2 minutes on each side or until it is golden and cooked through.
  2. Combine the beetroot, onion, rocket, anchovies, red wine vinegar and extra oil in a large bowl. Divide the mixture among plates and dot with teaspoons of ricotta. Serve topped with chicken.

Enjoy,

Allie

IMG_5603


IMG_5607

Leave a comment

Filed under Dinner, Lunch, Recipe

Brownie pudding

cheateats_18h94al-18h94b3

Back in elementary school Valentine’s Day was awesome.

Mum would always take my brothers and I to the store to go pick out our Valentine’s Day cards. I remember buying lots with The Little Mermaid, Care Bears, even Spongebob Squarepants. My brothers would always go for the Hot Wheels, GI Joe and NFL cards. We would go home and Mum would give each of us a list of our classmates and we’d address each card. And each card already had a witty little phrase on it so there was literally no thinking involved. Then Mum would help us stick a piece of candy to each and we’d have our bag ready to take the next day.

At school on Valentine’s Day we would each make our own little mailbox out of paper and cardboard, decorate it with stickers and glitter and then line them all up in a row along the wall. Then we’d get about ten minutes to distribute all our Valentines and then would have to sit anxiously until the end of the day and we could tear through all our new ‘mail’ and take home all the candy. It was like trick or treating on Halloween without even having to leave your house. We always came home with the biggest stash of sweets, of little conversation hearts and heart shaped lollipops. Sometimes one of the moms in the class would go all out and give us something great like heart shaped chocolate covered marshmallows.

Even more important than the candy though, were the cards. After school my friends and I used to sort through the cards looking for ones from the boys we liked. Then we’d try and suss out what they meant. For example, one year when the boy I had a crush on gave me a card with Aladdin and Jasmine on it that said ‘You’ve set my heart soaring Valentine!’ we figured he had clearly picked out that card specifically for me and that we would be married the next day in class and live happily ever after in our Barbie mansion.

After the end of that year, and the realization that I was still not living in a Barbie mansion, Valentine’s Days started to suck pretty hard. Middle school, high school, no one wants to deal with trying to find a Valentine when their mouth is full of wires and their hair seems to stick out in all directions no matter what they do to it.

Even though I do enjoy it now, I still don’t know what the point of Valentine’s Day is. If you’re in a relationship you should be able to surprise the other all the time to show him or her you love them and if you’re not in a relationship it’s a silly reminder of when you were sitting at home in your Little Mermaid nightie looking up at a poster of Heath Ledger wondering when he would come sing a romantic song for you at your high school and then take you paintballing.

I’m not trying to diss Valentine’s Day; I know Ciaran and I will have an amazing time, especially now that I’ve left all the planning to him. But it will also continue to be a reminder of the day that I wasn’t invited to get married and go live in a Barbie mansion when I was 7. And that is a crushed dream that is very hard to live with.

Luckily, this outrageous brownie pudding is just the thing to soften my pain.

Brownie pudding
Serves 6

225g unsalted butter, plus little extra for buttering the dish
4 extra large eggs, at room temperature
2 cups sugar
3/4 cup good cocoa powder
1/2 cup all purpose flour
Seeds scraped from 1 vanilla bean

Vanilla ice cream to serve with

Preheat the oven to 160 degrees. Lightly butter a 2 quart (9 x 12) by 2 inch oval baking dish. Melt the butter and set aside to cool.

In the bowl of an electric mixer fitted with the paddle attachment, beat the eggs and sugar on medium high speed for 5 to 10 minutes, until very thick and light yellow. Meanwhile, sift the cocoa powder and flour together and set aside.

When the egg and sugar mixture is ready, lower the speed to low and add the vanilla seeds, and cocoa powder and flour mixture. Mix only until combined. With the mixer still on low, slowly pour in the cooled butter and mix again just until combined.

Pour the brownie mixture into the prepared dish and place it in a larger baking pan. Add enough of the hottest tap water to the pan to come halfway up the side of the dish and bake for exactly 1 hour. A cake tester inserted 2 inches from the side will come out three quarters clean. The center will appear very under-baked, this dessert is between a brownie and a pudding.

Allow to cool a little and serve with vanilla ice cream.

Enjoy,

Allie

IMG_1850

Leave a comment

Filed under Recipe, Sweet Treats

Seared tuna with greens and coconut rice

Jamie Oliver is a maniac in the kitchen. Probably out of the kitchen as well  based on his Instagram posts. I’ve often shied away from Jamie Oliver recipes simply due to the amount of ingredients he uses. Even in his new book 15 Minute Meals he’s got about two pages at the beginning of the book with a pretty extensive list of things you should have in your pantry. Things like kaffir lime leaves and plenty of herbs and spices I’m not very familiar with. Despite his flair for throwing in everything but the kitchen sink, he does come up with some good simple recipes every once in a while and I really think this is one of them. While it is a 15 minute meal in Jamie’s world, it was more of a 40 minute meal in our world, with two people cooking, but I think now that we’ve gotten the hang of it we could make it much more quickly. The jiggy greens (his words, not mine) and rice are brilliant ideas as well and we’ve made those side dishes since to accompany things like dumplings. All you have to do with the rice is take a 270ml can of coconut milk, pour that into a pot, then fill the empty can with boiling water, add that to the pot and then fill the can again with basmati rice and add that to the pot. Then bring to a boil and simmer for 10 minutes, it’s been perfect every time and it’s really quite tasty. The tuna is a bit more temperamental because it doesn’t need to cook for long. If you find yourself thinking about whether it has been on for too long, it’s already done, it’s just a quick sear and you’re good to go. While this may be more of a weekend dinner due to all the steps, it is definitely worth a try. So go on, get stuck in!

Enjoy,

Allie

IMG_2424

Seared Tuna with Greens and Coconut Rice
Recipe from Jamie Oliver’s 15 minute meals
serves 4
Ingredients
400g fresh tuna fillet (ask for these at your local seafood shop)
2 tblsp sesame seeds
1 tsp green tea powder (simply take a tea bag of green tea, rip it open and use one teaspoon of that powder)
Salt and pepper
½ tsp vegetable oil
Greens:
Small bunch of mini asparagus
Small bunch of broccolini (tenderstem broccoli)
1 tsp crushed garlic
½ tsp sesame oil
1 tblsp oyster sauce
Rice:
270g tin of reduced fat coconut milk
Basmati rice to fill an empty 270g tin
Boiling water to fill an empty 270g tin
Pinch of salt
Method:
1. For the rice: Place the coconut milk, rice, boiling water and salt into a medium saucepan over medium-high heat. Bring to the boil, then reduce heat to a simmer, cover and cook for about 10 minutes, until the liquid is absorbed. Remove from the heat.
2. For the greens: Finely slice the asparagus and broccolini (in a food processor or using a knife – just make the pieces very small). Heat the oil in a frying pan over medium-high heat, add the vegetables and garlic and stir for 1 minute, until the vegetables have softened slightly. Add the oyster sauce and stir to combine. Spoon the vegetables into a serving bowl.
3. For the tuna: Cut the tuna into logs about 4cm (1½ inch) in diameter. Mix the sesame seeds, green tea, salt and pepper on a board, then roll the tuna logs in the mixture until all sides of the tuna are coated. Heat the oil in the frying pan over high heat, then add the tuna and cook for 30 seconds on each side, until barely cooked on the outside and still raw on the inside. Remove from the heat and cut the tuna into 1cm (1/2 inch) slices.

Leave a comment

Filed under Dinner, Recipe

Caprese salad pasta

IMG_5488

Lots of people have a go to dish when they’re not feeling great. Chicken soup, congee with leftovers, scrambled eggs and toast, anything simple and comforting. You’re not supposed to eat anything dairy or acidic while you’re feeling ill. So this dish isn’t exactly ideal but it still seems to make me feel better. It’s one of my favourite dishes while I’m home too. It takes all of half an hour and five ingredients. A perfect weeknight meal or cozy feel-better dish when you’re sick.

Caprese salad pasta
Serves 5

500g pasta (bowtie or penne)
3 ripe tomatoes, diced
250g mozzarella, diced
3/4 cup basil, chopped
Olive oil
Salt and pepper, to taste

Cook the pasta according to directions. While the pasta is cooking dice the tomatoes, the mozzarella and the basil. Just after the pasta is done cooking and you’ve drained it return it to the pot and add a drizzle of olive oil and then add the tomato and mozzarella. Mix them in and then let the pot sit with the lid on so the cheese melts and heats through. After about five minutes add the basil and stir through. Serve immediately.

Enjoy,

Allie

IMG_5484


IMG_5498

Leave a comment

Filed under Dinner, Lunch, Recipe

Superbowl snacks!

main_18gjk2c-18gjk40

So the Superbowl is here again. That one magical Sunday built for beer-loving, wing-loving, football-loving people around the world. Well, mostly just in America but I’ll be one of the die-hards trying to stream the game at 10am on Monday morning.

Unfortunately we don’t get to appreciate the whole package that is Superbowl Sunday down under. But I won’t complain that much about early morning beer.

To be honest, I do find it strange that I am actually looking forward to this, and NOT just for the buffalo chicken wings. I promise.

I am actually a bit excited to see the game. I bet you anything my brothers are sniggering as they read this.

I used to loathe football. I thought it was single-handedly the MOST boring thing to watch. At a NFL game, a college game, my brother’s game, on the couch in front of the TV. Except for maybe golf, golf is so boring.

I never understood the rules and it always just looked like a group of tall, wide men running into each other. And then stopping and standing in a line. And starting. And stopping again, maybe watching the grass grow a bit. The games seemed to take forever and I used to look in awe at my father and grandfather sitting there for an entire day watching game after game. How were they not bored to tears?

The worst part about football happened in November every year. Every year I was dragged (not brought, dragged) to the Harvard vs. Yale game. Quite a few men in my family attended Harvard University and apparently a Harvard man never misses the rivalry game. So whether it was in Connecticut and we simply drove to the game or in Boston where we stayed at my uncle’s for the weekend, we went every year. I would sit there, in the freezing cold, twiddling my thumbs until it was time to leave. I used to try and get out of it, believe me. I would fake being sick, Ferris Bueller-style, I think I even tried to hide one year. Those hours sitting hunched up in about seven layers of coats watching these men run back and forth were not a highlight of my childhood.

But then something changed. I started to realize that there was a bit more to the Superbowl than the amusing ads every few minutes. I actually started to pay attention to the rules and understand them. It’s actually not that complicated a game when it comes down to it. And now I kind of ENJOY it. What the heck happened? I still haven’t really been able to put my finger on it, but I think it’s a homesick thing. Watching the football does remind me of home, of making snacks for game days or drinking a beer with my dad. It’s comforting and I never thought I’d see the day.

I’ll still never go to a Harvard Yale game though. I’m sorry but that game is too damn cold.
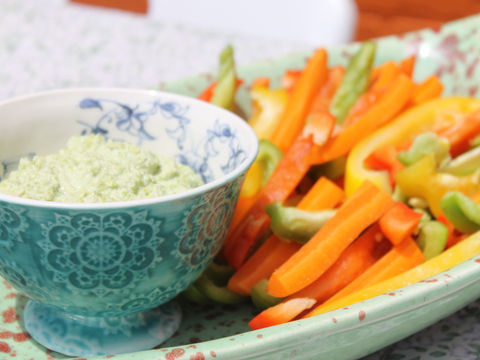
hummusandveggies_18gjk2v-18gjk44

Edamame hummus

Serves 4

Ingredients
1 cup edamame, cooked and shelled
1 tablespoon tahini (sesame seed paste)
1/8 cup water plus more if needed
1 teaspoon lemon zest
Juice of ½ a lemon
1 clove garlic, crushed
1 teaspoon olive oil

Salt and pepper to taste

In a food processor, blend soy beans, tahini, water, lemon zest, lemon juice, garlic, olive oil, salt and pepper. Add more water if necessary until the consistency is smooth. Place in a small bowl and serve with sliced vegetables such as capsicum or carrots.

untitled_1_18gjk3h-18gjk46


untitled_2_18gjk3n-18gjk46

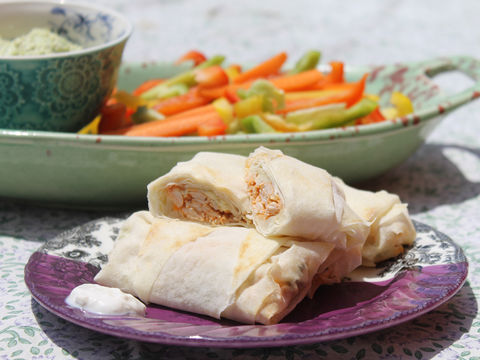
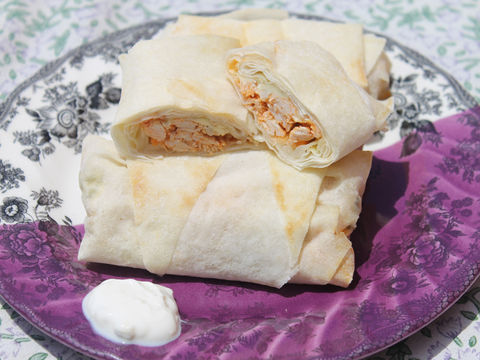
Buffalo Chicken Rolls

Makes 12

Ingredients
12 spring roll wrappers (I found these in the freezer section at Coles)
1 cup cooked and shredded chicken (1 medium chicken breast)
1/2- 2/3 cup Frank’s Red Hot Sauce (I found this at my local IGA)
1 cup crumbled blue cheese
1 cup cole slaw (dry)
Small bowl of water
Nonstick cooking spray

Blue cheese dressing, for serving

Preheat oven to 200 degrees C. Lay spring roll wrappers on a clean work surface. In a small bowl, stir chicken* (see note below) and hot sauce until well coated, using more or less sauce depending on your spice preference. The meat should be moist with sauce.

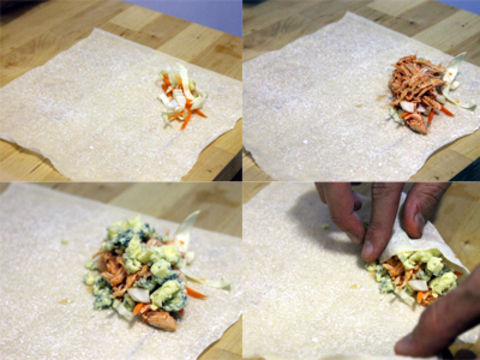
Begin by placing one tablespoon of the cole slaw on the diagonal of the bottom right corner of one of the wrappers. Next, place 2 tablespoons of shredded spicy chicken evenly on top of the slaw. Spoon 1 tablespoon of the blue cheese crumbles over the chicken. Do not overfill.

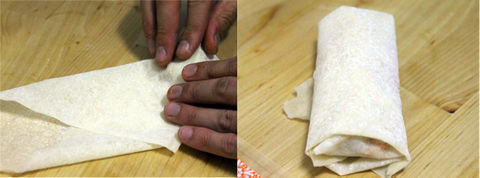
To fold: Fold the bottom right corner over the stuffing mixture so that it covers it completely, with the tip of the corner now pointing to the centre of the spring roll wrapper. Fold in the bottom left corner, followed by the right, so that you now have formed an envelope. Roll the wrap upward one time, leaving the top left corner open. Wet your index finger in the small bowl of water and press to moisten the top left corner. Now fold that down on top of the filled roll, sealing it like you would an envelope.

Repeat with remaining rolls.

Place the rolls on a wire rack set on top of a cookie sheet (or just on a greased cookie sheet) coated with nonstick cooking spray. Spritz each roll evenly with nonstick cooking spray. Bake for 12-15 minutes, or until the rolls crisp and turn a light golden brown.

Note: To make the chicken, place 200g of uncooked chicken breast in a small pot and fill with enough water just to cover it. Bring to a boil on your stovetop, reduce the heat slightly, then simmer for about 12 minutes, or until cooked through. Drain and let cool before shredding with two forks, pulling against the grain of the meat.

Recipe slightly adapted from Can you stay for dinner?

chickenrolls_18gjk2k-18gjk41

Oh and just in case anyone out there was wondering, with my rice and beans mention earlier, I just meant I wouldn’t be eating solely beans and rice, because while it would save me lots of pennies, I know we are creative enough to be able to make the rice and beans into delicious things like enchiladas or tacos or chilli! And I highly recommend you make Kahina’s chilli for Superbowl Day as well, I definitely will be!

Enjoy,

Allie


Leave a comment

Filed under Dinner, Lunch, Recipe

Bowties with chicken sausage, yoghurt and zucchini

IMG_5451

I don’t like saving. I haven’t even really started saving yet but I already hate it. That’s right, Allie is officially on a budget. This may suck. But it’s for a good reason, as saving usually tends to be. Ciaran and I are planning a trip to Europe later this year, we will both be recent university graduates and we are both currently jobless so it seemed like a good time. Things may change, we know that, but for now we will prepare as if we are both still free in September and will whisk away to sing showtunes in the hills in Austria and lounge on the beaches in Greece and eat nothing but carbs in Italy and see new places and faces and explore. Sounds pretty ideal. I think I just have to keep repeating that to myself when I’m about to order another drink at the bar or step into Dotti or Sportsgirl ‘just to check’ what they have in store.

Luckily, food is generally an easy area to save a few bucks. I’ve been doing much better at eating on the cheap this year but I think I can push it even further. But don’t fear, there will be no beans and rice posts on this blog! Ick. I’ll just have to find ways to use cheap ingredients and stretch my food further. So far this year it has been going very well. The other day I made corn, pea and haloumi fritters with a tomato salad using only ingredients that I already had! Such a win. Another lucky thing in this whole saving my pennies plan is that pasta is cheap. And man do I love pasta. So I will use that excuse to eat those pillowly carby little bites but only topped with healthy ingredients. Shouldn’t be too hard, right?

Enjoy,

Allie

Bowties with chicken sausage, yoghurt and zucchini
Adapted from Food and Wine
Serves 4-6

500g bowties
4 medium zucchini (about 1 1/2 pounds), coarsely shredded
4 tablespoons unsalted butter
1 cup plain whole-milk Greek yogurt
300g chicken sausage (we used kid’s chicken sausages since they were cheap 🙂 )
1 cup grated Parmigiano-Reggiano cheese, plus more for serving
Pinch of nutmeg
Salt and pepper to taste

  1. In a large pot of boiling salted water, cook the farfalle until al dente; about 1 minute before the farfalle is done, add the shredded zucchini to the pot. Drain the farfalle and zucchini, reserving 1/4 cup of the pasta cooking water.
  2. While the pasta is cooking, heat a medium frying pan over medium high heat and cook the sausage until browned and cooked all the way through. We took off the casing and separated the sausage into small chunks or you can cook it whole and chop it up after.
  3. After the sausage is done, place it on a paper towel to drain and use the same frying pan to melt the butter. Remove from the heat. Stir in the Greek yogurt and the 1 cup of grated Parmigiano-Reggiano and season the yogurt sauce with nutmeg, salt and pepper.
  4. Add the bowtie, chicken sausage, zucchini and reserved pasta water to the saucepan and cook over low heat, tossing, until the sauce coats the pasta; transfer to warmed bowls and serve with the extra cheese.

IMG_5452

Leave a comment

Filed under Dinner, Lunch, Recipe

Double-chocolate lamingtons

IMG_5521

Happy belated Australia day!!!! It was really great to be able to celebrate Australia Day in Australia once again. Last year I was melting in the sun at Big Day Out and unfortunately didn’t really get up to very much ‘Aussie Aussie Aussie Oi Oi Oi’ chanting. So this year I made sure to have a few Aussie beers, listen to Triple J’s Hottest 100 and of course buy a pack of the mandatory Australian flag temporary tattoos to plaster on my arms. Unfortunately I did have to work last night, which got in the way of my drinking celebrations, but only for a few hours. And since I work in hospitality we were open on Australia Day but we have Monday, the public holiday, off and I’ve planned to continue the celebrations then.

When there’s celebrations, there must always be cake, as Kahina mentioned just yesterday. So I decided to make lamingtons, something I believe to be classically Australian. Many people are unsure of Australia’s cuisine. Maybe unsure is the wrong word, but many people seem to lament the lack of purely Australian dishes. I always associated meat pies with Australia but turns out Britain seems to have claim to them. Pavlova is supposedly Australian but if there’s a Kiwi in the room when you mention it there might be a bit of a scuffle. I don’t think it matters if you have a dish that’s pure ‘Strayan. The main thing I love about Australian cuisine is just how diverse it is. We have dishes with Malaysian influences, Irish, British, Greek, Italian, you name it. Salt and pepper squid is found all over Australia, in Thai restaurants, Italian cafes, Belgian restaurants. They all do it differently and that’s what makes it great. Some might even say that these double-chocolate lamingtons aren’t pure Australian because of the extra cocoa added to make the sponge chocolatey. Some have even called it ‘sacrilegious.’ I think that’s going a little far seeing as the essence is still the same and it’s just giving it another influence, another twist. Australian cuisine is unique in the influences that have come from all over the world. In last week’s Good Food David Chang of Momofuku pretty much summed it up, “If any country can get away from asking, “What’s our tradition?” and say, “Let’s just eat good food,” it’s definitely Australia.”

Enjoy,

Allie

Double-chocolate lamingtons
Recipe from Dan Lepard

Ingredients

300g castor sugar
50g cocoa
75ml milk
50g unsalted butter
50g dark chocolate
50ml sunflower oil
4 medium eggs
100ml low-fat natural yoghurt
3 tsp vanilla extract
175g plain flour
3 tsp baking powder

For the coating (makes 750ml)

15g cocoa
50ml cold milk
175ml boiling water
200g dark chocolate, finely chopped
450g icing sugar
1-2 250g bags coconut (that is, much more than you would think)

Method

1. Line the base of a deep, 20cm square cake tin with non-stick paper and heat the oven to 170C (150C fan-forced). Put the sugar and cocoa in a bowl and beat in the milk. Melt the butter and chocolate in a saucepan, and add to the sugar mix along with the oil. Beat in the eggs until smooth, stir in the yoghurt and vanilla, and mix in the flour and baking powder. Pour into the tin, cover with a slightly domed sheet of foil and bake for an hour. Lift off the foil for the last 15 minutes. Remove, cool in the tin and, while warm, cover with cling film to keep them moist.

2. For the coating, mix the cocoa and milk until smooth, whisk in the boiling water, then stir in the chocolate until melted. Whisk in the icing sugar until dissolved and pour into a deep, wide jug. Cut the cake into nine, dunk each piece in the coating and fish out with two forks. Roll in coconut and leave to set.

Note: Lepard advises putting foil over the cake because it helps the cake rise more evenly. You’ll have about 250 millilitres of coating left over – just the stuff, he says, for lamington milkshakes with ice-cream and coconut.

IMG_5515

IMG_5514

IMG_5517

IMG_5520

IMG_5526

IMG_5525

2 Comments

Filed under Recipe, Sweet Treats